Drill Sergeant mascot introducing handpiece maintenance and the Handpiece Repair Tracker
Handpiece Maintenance

Fewer repairs. Better habits.

Drill Sergeant mascot introducing handpiece maintenance and the Handpiece Repair Tracker

Learn quick maintenance tips and get access to the Handpiece Repair Tracker.

📋
Get access to the Handpiece Repair Tracker Help your team stay organized, monitor repairs, and make handpiece maintenance easier to manage.
🦷
Topic 1 of 3

Small habits matter

Daily care can make a big difference in handpiece performance and longevity.

📋 Handpiece Repair Tracker

Want an easier way to stay on top of repairs?

Get access to the Handpiece Repair Tracker and give your team a simple way to organize handpieces, repair history, and maintenance habits.

Protect performance

Simple habits that help handpieces run more consistently.

Track repairs

Get access to the Handpiece Repair Tracker to help your team stay organized.

Access the tracker →
Lower costs

Better routines can help reduce unnecessary repair spend.

The Real Cost of Handpiece Repairs — And How to Slash It
🦷

The Real Cost of Handpiece Repairs

And Tips on How to Prevent Them

Average Annual Cost

$2,000 – $6,000+

per typical dental practice

Most common hidden expense
70%

AVOIDABLE

50–70%

$1,000 – $4,000+ saved per year

Proper maintenance & protocols = thousands saved annually

Real-world data from repair specialists

Savings with Clean & Lubricate

$1,000 – $4,000+

per year per practice

When you follow proper protocols

Repair frequency without care

Every 3–6 months

With proper protocols

Every 18–24+ months

Typical repair cost

$90 – $350 each

WITHOUT PROTOCOLS

Expensive Cycle of Failure

  • Frequent turbine failures (2–4× per year)
  • Cheap repairs that fail again quickly
  • Downtime = lost chair time (~$120/hour)
  • Total annual cost: $2k–$6k+
WITH PROPER PROTOCOLS

Smart, Predictable Savings

  • $1,000 – $4,000+ savings per year
  • Quality repairs last 18–24 months
  • Minimal downtime & emergency calls
  • 50–70% lower annual repair spend

3 Simple Protocols That Save Thousands

Follow these daily

Use Bien-Air Lubricant & Cleaner

Bien-Air is the ONLY brand that offers both a dedicated cleaner AND lubricant. The cleaner removes harmful debris (blood, saliva, composite) that can carbonize in the autoclave. The lubricant creates a protective film that dramatically reduces wear.

Highly Recommended

Autoclave Correctly

Always remove the bur before sterilizing. Never overload. Use proper pouches and follow temperature guidelines. Allow natural cooling — avoid thermal shock that cracks bearings.

Quality Repairs

Choose OEM-grade bearings and professional service. Cheap repairs fail quickly and cost more in the long run. Bien-Air offers a transparent and easy to use repair service on all Bien-Air parts.

Start Saving with the Lubricare 2

The Lubricare 2 takes all of the guesswork out of maintenance and cleaning and pays for itself in just a few months, depending on your use. Use the calculator below to see exactly how fast it pays off.

Helpful Resources

Lubricare 2: Maintenance Made Easy

In this short video, we showcase the Lubricare 2 maintenance system. Save up to 4x the amount of spray used!

Lubricare 2 video thumbnail

Manual Maintenance Contra Angles

This video shows you how to manually maintenance your Contra Angle attachments using the Spraynet and Lubrifluid.

Manual Maintenance Surgical Attachments

This video shows you how to manually maintenance your Contra Angle surgical attachments using the Spraynet, Lubrifluid and Aquarcare.

Manual Maintenance Air-Driven Handpieces

This video shows you how to properly maintain your air-driven handpieces using the Spraynet and Lubrifluid bottles from Bien-Air.

Properly Maintaining Surgical Cables

This video shows you how to properly disconnect, clean and maintain your surgical cable before sterilizing it.

Maintenance Using the Lubricare 2

This video shows you how easy it is to automatically maintain your air and electric attachments using the Lubricare 2.

Maintenance Modes on Lubricare 2

This video shows how and when to properly run the maintenance modes on the Lubricare 2 system from Bien-Air.

Maintenance Guide

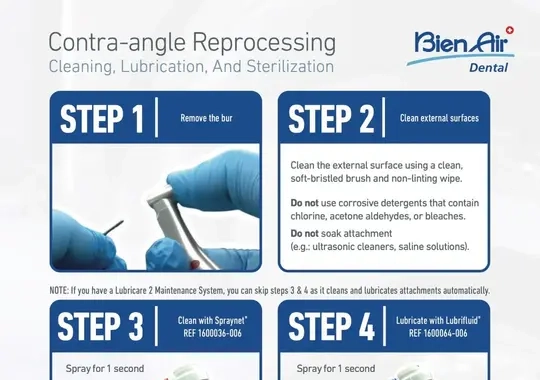
Complete step-by-step instructions for maintaining contra angle attachments.

Maintenance Guide PDF preview
↓ Download PDF

Preventative Maintenance

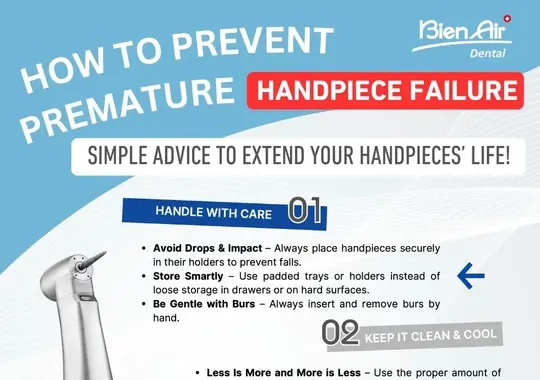
Helpful tips to keep your handpieces running like the precision instruments they were designed to be.

Preventative Maintenance PDF preview
↓ Download PDF
Proper Sterilization Preparation

Preparation

A. Removing the Bur

  • Remove the rotary bur from the chuck mechanism

Preliminary Cleaning

A. Rinsing the Device

  • Clean the exterior and the interior of the device under tap water

B. Removing Dirt/Deposits

  • Dry the nozzles and then dry the rest of the instrument with a sterilize non-woven compress (low linting textiles).

Disinfection

A. Cleaning and Disinfection

  • Dip the device in a bath containing a cleaning product/disinfectant
  • Brush the device with a smooth, flexible brush. DO NOT USE a wire brush.
  • Rinse the device twice under running tap water.

Manual Cleaning & Drying

A. Internal and external cleaning and drying with Spraynet

  • Shake the Spraynet bottle before each use.
  • Select the appropriate Spraynet nozzle.
  • Keep the tip of the instrument pointing down and protect it with a sterile non-woven cloth.
  • Activate the Spraynet for about 1 second.

Lubrification

A. Lubrication with Lubrifluid

  • Shake the Lubrifluid bottle before each use.
  • Select the appropriate Lubrifluid nozzle.
  • Keep the tip of the instrument pointed down and protect it with an absorbent cloth.
  • Activate the Lubrifluid for about 1 second.

Lubricare

A. If you’re using the Lubricare 2, the process for cleaning and lubricating the inside of the attachment is much simpler.

  • Run one cycle for cleaning (20 seconds) making sure the chuck of the handpiece faces inside.
  • Run one cycle for lubricating (20 seconds) again, making sure the chuck of the handpiece faces inside.

Sterilization

A. Place the contra-angle in a sterilization bag.
B. Sterilize in accordance with the manufacturer’s instructions.

    • Only instruments bearing the “135°C” symbol can be sterilized in an autoclave
    • Only sterilize instruments which have been properly cleaned, dried and lubricated.

Learn More

Want to Learn More about Our Products?

Click the image below to browse our complete collection or visit our website directly.

Catalog Preview
VIEW FULL CATALOG →

Find Your Rep

Enter a 2-letter state/province abbreviation (e.g., CA or QC) or a 5-digit ZIP code (e.g., 90210) to find the contact information for the rep handling that area. For regions with multiple reps (like CA, NV, etc.), please use a ZIP code.

Answer a few short questions to get Access

Upon Successful Registration You'll Get Automatically Logged In